יצירת Backend מותאם אישית ו-Transpile מולו
# Added by doQumentation — required packages for this notebook
!pip install -q numpy qiskit rustworkx
# Don't use SVGs for this file because the images are too large,
# and the SVGs are much larger than their PNGs equivalents.
%config InlineBackend.figure_format='png'
```json

{/* cspell:ignore multichip interchip Lasciate ogne speranza voi ch'intrate */}
{/*
  DO NOT EDIT THIS CELL!!!
  This cell's content is generated automatically by a script. Anything you add
  here will be removed next time the notebook is run. To add new content, create
  a new cell before or after this one.
*/}

<details>
<summary><b>Package versions</b></summary>

The code on this page was developed using the following requirements.
We recommend using these versions or newer.
qiskit[all]~=2.4.0
</details>
{/* cspell:ignore LOCC */}

אחת התכונות החזקות יותר של Qiskit היא היכולת לתמוך בתצורות התקנים ייחודיות. Qiskit בנוי להיות אגנוסטי לספק של חומרת הקוונטום שבה אתה משתמש, וספקים יכולים להגדיר את האובייקט `BackendV2` לפי מאפייני ההתקן הייחודיים שלהם. נושא זה מדגים כיצד להגדיר Backend משלך ולבצע Transpile של מעגלים קוונטיים מולו.

ניתן ליצור אובייקטי `BackendV2` ייחודיים עם גיאומטריות שונות או שערי בסיס שונים, ולבצע Transpile של המעגלים שלך עם תצורות אלה בחשבון. הדוגמה שלהלן מכסה Backend עם סריג qubit מנותק, שבו שערי הבסיס שלו שונים לאורך הקצוות לעומת הפנים.
## הבנת ממשקי Provider, BackendV2 ו-Target \{#understand-the-provider-backendv2-and-target-interfaces}

לפני שמתחילים, כדאי להבין את השימוש והמטרה של האובייקטים [`Provider`](../api/qiskit/providers), [`BackendV2`](../api/qiskit/qiskit.providers.BackendV2) ו-[`Target`](../api/qiskit/qiskit.transpiler.Target).

- אם יש לך התקן קוונטי או סימולטור שברצונך לשלב ב-Qiskit SDK, עליך לכתוב מחלקת `Provider` משלך. מחלקה זו משרתת מטרה אחת בלבד: לאחזר אובייקטי Backend שאתה מספק. כאן מטופלות כל משימות האימות ו/או ההזדהות הנדרשות. לאחר האתחול, אובייקט ה-Provider יספק רשימת Backends וכן את היכולת לאחזר ולאתחל Backends.

- לאחר מכן, מחלקות ה-Backend מספקות את הממשק בין Qiskit SDK לחומרה או לסימולטור שיבצע את המעגלים. הן כוללות את כל המידע הדרוש לתאר Backend ל-Transpiler, כדי שיוכל לבצע אופטימיזציה של כל מעגל בהתאם למגבלותיו. `BackendV2` בנוי מארבעה חלקים עיקריים:
  - מאפיין [`Target`](../api/qiskit/qiskit.transpiler.Target), המכיל תיאור של מגבלות ה-Backend ומספק מודל שלו ל-Transpiler
  - מאפיין `max_circuits` המגדיר מגבלה על מספר המעגלים שה-Backend יכול לבצע בעבודה אחת
  - מתודה `run()` המקבלת הגשות עבודות
  - קבוצת `_default_options` להגדרת האפשרויות הניתנות להגדרה על ידי המשתמש וערכי ברירת המחדל שלהן
## יצירת BackendV2 מותאם אישית \{#create-a-custom-backendv2}

האובייקט `BackendV2` הוא מחלקה מופשטת המשמשת לכל אובייקטי ה-Backend שנוצרים על ידי ספק (בין אם בתוך `qiskit.providers` ובין אם בספרייה אחרת כגון [`qiskit_ibm_runtime.IBMBackend`](../api/qiskit-ibm-runtime/ibm-backend)). כאמור לעיל, אובייקטים אלה מכילים מספר תכונות, כולל [`Target`](https://docs.quantum.ibm.com/api/qiskit/qiskit.transpiler.Target). ה-`Target` מכיל מידע המציין את תכונות ה-Backend — כגון ה-[`Coupling Map`](https://docs.quantum.ibm.com/api/qiskit/qiskit.transpiler.CouplingMap), רשימת [`Instructions`](https://docs.quantum.ibm.com/api/qiskit/qiskit.circuit.Instruction) ועוד — ל-Transpiler. בנוסף ל-`Target`, ניתן גם להגדיר פרטי רמת פולס כגון [`DriveChannel`](https://docs.quantum.ibm.com/api/qiskit/1.4/qiskit.pulse.channels.DriveChannel) או [`ControlChannel`](https://docs.quantum.ibm.com/api/qiskit/1.4/qiskit.pulse.channels.ControlChannel).

הדוגמה הבאה מדגימה התאמה אישית זו על ידי יצירת Backend מרובה-שבבים מדומה, שבו כל שבב בעל קישוריות heavy-hex. הדוגמה מציינת שמערך השערים הדו-Qubit של ה-Backend יהיה [`CZGates`](../api/qiskit/qiskit.circuit.library.CZGate) בתוך כל שבב ו-[`CXGates`](../api/qiskit/qiskit.circuit.library.ECRGate) בין שבבים. ראשית, צור `BackendV2` משלך והתאם אישית את ה-`Target` שלו עם שערים חד וגם דו-Qubit בהתאם למגבלות שתוארו קודם לכן.

<Admonition type="tip" title="ספריית graphviz">
ציור מפת קישוריות דורש את התקנת ספריית [`graphviz`](https://graphviz.org/).
</Admonition>

```python
import numpy as np
import rustworkx as rx

from qiskit.providers import BackendV2, Options
from qiskit.transpiler import Target, InstructionProperties
from qiskit.circuit.library import XGate, SXGate, RZGate, CZGate, ECRGate
from qiskit.circuit import Measure, Delay, Parameter, Reset
from qiskit import QuantumCircuit, transpile
from qiskit.visualization import plot_gate_map

class FakeLOCCBackend(BackendV2):
    """Fake multi chip backend."""

    def __init__(self, distance=3, number_of_chips=3):
        """Instantiate a new fake multi chip backend.

        Args:
            distance (int): The heavy hex code distance to use for each chips'
                coupling map. This number **must** be odd. The distance relates
                to the number of qubits by:
                :math:`n = \\frac{5d^2 - 2d - 1}{2}` where :math:`n` is the
                number of qubits and :math:`d` is the ``distance``
            number_of_chips (int): The number of chips to have in the multichip backend
                each chip will be a heavy hex graph of ``distance`` code distance.
        """
        super().__init__(name="Fake LOCC backend")
        # Create a heavy-hex graph using the
        # rustworkx library, then instantiate a new target
        self._graph = rx.generators.directed_heavy_hex_graph(
            distance, bidirectional=False
        )
        num_qubits = len(self._graph) * number_of_chips
        self._target = Target(
            "Fake multi-chip backend", num_qubits=num_qubits
        )

        # Generate instruction properties for single qubit gates and a measurement, delay,
        #  and reset operation to every qubit in the backend.
        rng = np.random.default_rng(seed=12345678942)
        rz_props = {}
        x_props = {}
        sx_props = {}
        measure_props = {}
        delay_props = {}

        # Add 1q gates. Globally use virtual rz, x, sx, and measure
        for i in range(num_qubits):
            qarg = (i,)
            rz_props[qarg] = InstructionProperties(error=0.0, duration=0.0)
            x_props[qarg] = InstructionProperties(
                error=rng.uniform(1e-6, 1e-4),
                duration=rng.uniform(1e-8, 9e-7),
            )
            sx_props[qarg] = InstructionProperties(
                error=rng.uniform(1e-6, 1e-4),
                duration=rng.uniform(1e-8, 9e-7),
            )
            measure_props[qarg] = InstructionProperties(
                error=rng.uniform(1e-3, 1e-1),
                duration=rng.uniform(1e-8, 9e-7),
            )
            delay_props[qarg] = None
        self._target.add_instruction(XGate(), x_props)
        self._target.add_instruction(SXGate(), sx_props)
        self._target.add_instruction(RZGate(Parameter("theta")), rz_props)
        self._target.add_instruction(Measure(), measure_props)
        self._target.add_instruction(Reset(), measure_props)

        self._target.add_instruction(Delay(Parameter("t")), delay_props)
        # Add chip local 2q gate which is CZ
        cz_props = {}
        for i in range(number_of_chips):
            for root_edge in self._graph.edge_list():
                offset = i * len(self._graph)
                edge = (root_edge[0] + offset, root_edge[1] + offset)
                cz_props[edge] = InstructionProperties(
                    error=rng.uniform(7e-4, 5e-3),
                    duration=rng.uniform(1e-8, 9e-7),
                )
        self._target.add_instruction(CZGate(), cz_props)

        cx_props = {}
        # Add interchip 2q gates which are ecr (effectively CX)
        # First determine which nodes to connect
        node_indices = self._graph.node_indices()
        edge_list = self._graph.edge_list()
        inter_chip_nodes = {}
        for node in node_indices:
            count = 0
            for edge in edge_list:
                if node == edge[0]:
                    count += 1
            if count == 1:
                inter_chip_nodes[node] = count
        # Create inter-chip ecr props
        cx_props = {}
        inter_chip_edges = list(inter_chip_nodes.keys())
        for i in range(1, number_of_chips):
            offset = i * len(self._graph)
            edge = (
                inter_chip_edges[1] + (len(self._graph) * (i - 1)),
                inter_chip_edges[0] + offset,
            )
            cx_props[edge] = InstructionProperties(
                error=rng.uniform(7e-4, 5e-3),
                duration=rng.uniform(1e-8, 9e-7),
            )

        self._target.add_instruction(ECRGate(), cx_props)

    @property
    def target(self):
        return self._target

    @property
    def max_circuits(self):
        return None

    @property
    def graph(self):
        return self._graph

    @classmethod
    def _default_options(cls):
        return Options(shots=1024)

    def run(self, circuit, **kwargs):
        raise NotImplementedError(
            "This backend does not contain a run method"
        )
ויזואליזציה של Backends
ניתן לצפות בגרף הקישוריות של המחלקה החדשה הזו בעזרת מתודת plot_gate_map() ממודול qiskit.visualization. מתודה זו, יחד עם plot_coupling_map() ו-plot_circuit_layout(), הן כלים שימושיים לויזואליזציה של סידור ה-Qubit של Backend, וכן כיצד Circuit מפוזר על פני ה-Qubits של Backend. דוגמה זו יוצרת Backend המכיל שלושה שבבי heavy-hex קטנים. היא מציינת קבוצת קואורדינטות לסידור ה-Qubits, וכן קבוצת צבעים מותאמים אישית לשערים הדו-Qubit השונים.
backend = FakeLOCCBackend(3, 3)

target = backend.target
coupling_map_backend = target.build_coupling_map()

coordinates = [
    (3, 1),
    (3, -1),
    (2, -2),
    (1, 1),
    (0, 0),
    (-1, -1),
    (-2, 2),
    (-3, 1),
    (-3, -1),
    (2, 1),
    (1, -1),
    (-1, 1),
    (-2, -1),
    (3, 0),
    (2, -1),
    (0, 1),
    (0, -1),
    (-2, 1),
    (-3, 0),
]

single_qubit_coordinates = []
total_qubit_coordinates = []

for coordinate in coordinates:
    total_qubit_coordinates.append(coordinate)

for coordinate in coordinates:
    total_qubit_coordinates.append(
        (-1 * coordinate[0] + 1, coordinate[1] + 4)
    )

for coordinate in coordinates:
    total_qubit_coordinates.append((coordinate[0], coordinate[1] + 8))

line_colors = ["#adaaab" for edge in coupling_map_backend.get_edges()]
ecr_edges = []

# Get tuples for the edges which have an ecr instruction attached
for instruction in target.instructions:
    if instruction[0].name == "ecr":
        ecr_edges.append(instruction[1])

for i, edge in enumerate(coupling_map_backend.get_edges()):
    if edge in ecr_edges:
        line_colors[i] = "#000000"
print(backend.name)
plot_gate_map(
    backend,
    plot_directed=True,
    qubit_coordinates=total_qubit_coordinates,
    line_color=line_colors,
)
Fake LOCC backend
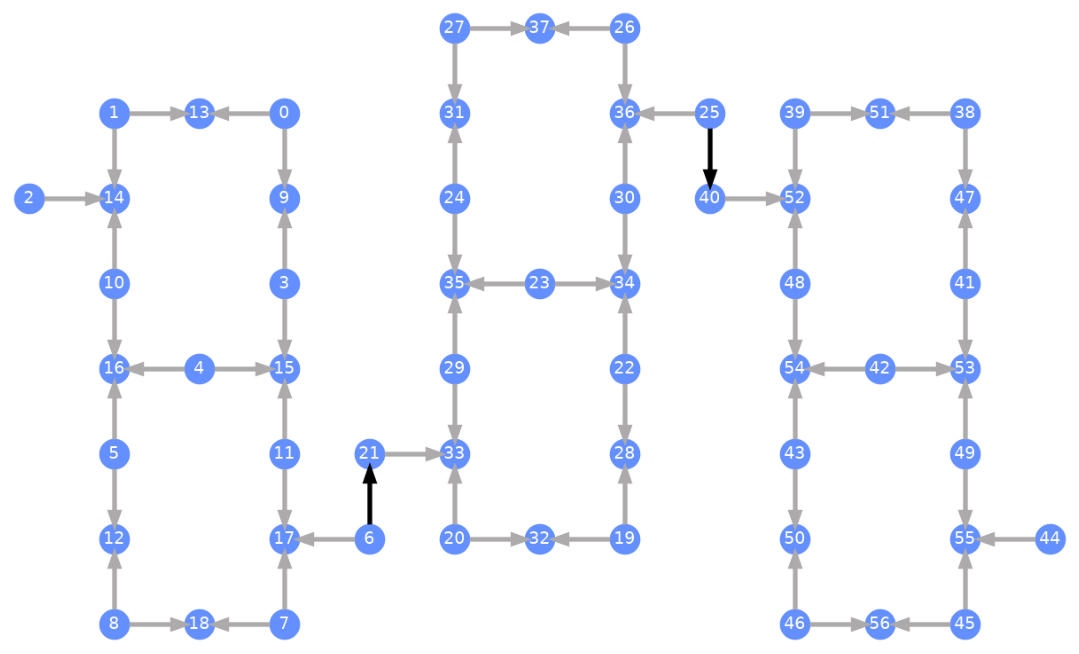
כל qubit ממוספר, וחצים צבעוניים מייצגים את השערים הדו-Qubit. חצים אפורים הם שערי CZ, וחצים שחורים הם שערי CX בין-שבביים (אלה מחברים qubits ו-). כיוון החץ מציין את כיוון ברירת המחדל שבו מבוצעים שערים אלה; הם מציינים אילו qubits הם שליטים/מטרות כברירת מחדל עבור כל ערוץ דו-Qubit.
Transpile מול Backends מותאמים אישית
כעת, לאחר שהוגדר Backend מותאם אישית עם Target ייחודי משלו, פשוט לבצע Transpile של מעגלים קוונטיים מול Backend זה, מכיוון שכל המגבלות הרלוונטיות (שערי בסיס, קישוריות qubit, וכן הלאה) הנדרשות למעברי ה-Transpiler נמצאות בתכונה זו. הדוגמה הבאה בונה Circuit היוצר מצב GHZ גדול ומבצע עליו Transpile מול ה-Backend שנבנה לעיל.
from qiskit.transpiler import generate_preset_pass_manager

num_qubits = 50
ghz = QuantumCircuit(num_qubits)
ghz.h(range(num_qubits))
ghz.cx(0, range(1, num_qubits))
op_counts = ghz.count_ops()

print("Pre-Transpilation: ")
print(f"CX gates: {op_counts['cx']}")
print(f"H gates: {op_counts['h']}")
print("\n", 30 * "#", "\n")

pm = generate_preset_pass_manager(optimization_level=3, backend=backend)
transpiled_ghz = pm.run(ghz)
op_counts = transpiled_ghz.count_ops()

print("Post-Transpilation: ")
print(f"CZ gates: {op_counts['cz']}")
print(f"ECR gates: {op_counts['ecr']}")
print(f"SX gates: {op_counts['sx']}")
print(f"RZ gates: {op_counts['rz']}")
Pre-Transpilation:
CX gates: 49
H gates: 50

 ##############################
Post-Transpilation:
CZ gates: 146
ECR gates: 6
SX gates: 302
RZ gates: 250
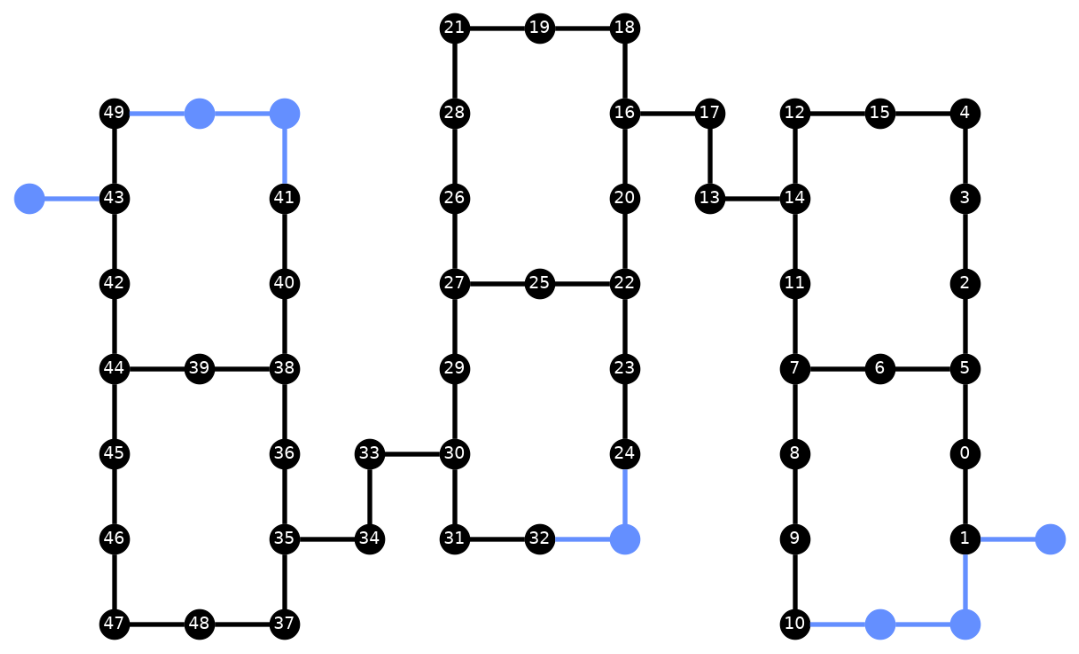
ה-Circuit לאחר Transpile מכיל כעת תמהיל של שערי CZ ו-ECR, שציינו כשערי הבסיס ב-Target של ה-Backend. יש גם הרבה יותר שערים מאשר התחלת בהם, בשל הצורך להכניס הוראות SWAP לאחר בחירת פריסה. להלן, כלי הויזואליזציה plot_circuit_layout() משמש לציון אילו qubits וערוצים דו-Qubit שימשו ב-Circuit זה.
from qiskit.visualization import plot_circuit_layout

plot_circuit_layout(
    transpiled_ghz, backend, qubit_coordinates=total_qubit_coordinates
)
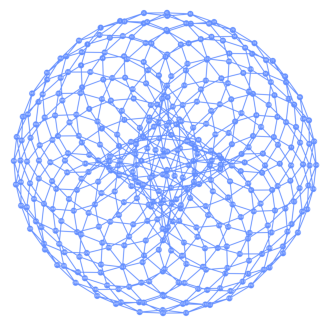
יצירת Backends ייחודיים
חבילת rustworkx מכילה ספרייה גדולה של גרפים שונים ומאפשרת יצירת גרפים מותאמים אישית. הקוד המעניין ויזואלית שלהלן יוצר Backend בהשראת קוד טורי. לאחר מכן תוכל לבצע ויזואליזציה של ה-Backend באמצעות הפונקציות מסעיף ויזואליזציה של Backends.
class FakeTorusBackend(BackendV2):
    """Fake multi chip backend."""

    def __init__(self):
        """Instantiate a new backend that is inspired by a toric code"""
        super().__init__(name="Fake LOCC backend")
        graph = rx.generators.directed_grid_graph(20, 20)
        for column in range(20):
            graph.add_edge(column, 19 * 20 + column, None)
        for row in range(20):
            graph.add_edge(row * 20, row * 20 + 19, None)
        num_qubits = len(graph)
        rng = np.random.default_rng(seed=12345678942)
        rz_props = {}
        x_props = {}
        sx_props = {}
        measure_props = {}
        delay_props = {}
        self._target = Target("Fake Kookaburra", num_qubits=num_qubits)
        # Add 1q gates. Globally use virtual rz, x, sx, and measure
        for i in range(num_qubits):
            qarg = (i,)
            rz_props[qarg] = InstructionProperties(error=0.0, duration=0.0)
            x_props[qarg] = InstructionProperties(
                error=rng.uniform(1e-6, 1e-4),
                duration=rng.uniform(1e-8, 9e-7),
            )
            sx_props[qarg] = InstructionProperties(
                error=rng.uniform(1e-6, 1e-4),
                duration=rng.uniform(1e-8, 9e-7),
            )
            measure_props[qarg] = InstructionProperties(
                error=rng.uniform(1e-3, 1e-1),
                duration=rng.uniform(1e-8, 9e-7),
            )
            delay_props[qarg] = None
        self._target.add_instruction(XGate(), x_props)
        self._target.add_instruction(SXGate(), sx_props)
        self._target.add_instruction(RZGate(Parameter("theta")), rz_props)
        self._target.add_instruction(Measure(), measure_props)
        self._target.add_instruction(Reset(), measure_props)
        self._target.add_instruction(Delay(Parameter("t")), delay_props)
        cz_props = {}
        for edge in graph.edge_list():
            cz_props[edge] = InstructionProperties(
                error=rng.uniform(7e-4, 5e-3),
                duration=rng.uniform(1e-8, 9e-7),
            )
        self._target.add_instruction(CZGate(), cz_props)

    @property
    def target(self):
        return self._target

    @property
    def max_circuits(self):
        return None

    @classmethod
    def _default_options(cls):
        return Options(shots=1024)

    def run(self, circuit, **kwargs):
        raise NotImplementedError("Lasciate ogne speranza, voi ch'intrate")
backend = FakeTorusBackend()
# We set `figsize` to a smaller size to make the documentation website faster
# to load. Normally, you do not need to set the argument.
plot_gate_map(backend, figsize=(4, 4))
num_qubits = int(backend.num_qubits / 2)
full_device_bv = QuantumCircuit(num_qubits, num_qubits - 1)
full_device_bv.x(num_qubits - 1)
full_device_bv.h(range(num_qubits))
full_device_bv.cx(range(num_qubits - 1), num_qubits - 1)
full_device_bv.h(range(num_qubits))
full_device_bv.measure(range(num_qubits - 1), range(num_qubits - 1))
tqc = transpile(full_device_bv, backend, optimization_level=3)
op_counts = tqc.count_ops()
print(f"CZ gates: {op_counts['cz']}")
print(f"X gates: {op_counts['x']}")
print(f"SX gates: {op_counts['sx']}")
print(f"RZ gates: {op_counts['rz']}")
CZ gates: 834
X gates: 18
SX gates: 1534
RZ gates: 1150